Has your phalaenopsis apparently stopped growing? Are its leaves drooping? I hope my advice can help you. For some 25 years, in my home, in Milwaukee, Wisconsin, I have been growing phalaenopsis, most often, in bark and/or sphagnum moss.
First we need to figure out the problem or problems. Let’s rule out insects sucking on leaves, especially tender new leaves. Use a loupe to inspect tops and undersides. If you see “critters” then check the American Orchid Society’s advice.
If you are new to phalaenopsis, the most likely cause for drooping is under hydration. Entirely remove your orchid from its container, remove the media, and inspect your orchid’s roots. If they’re firm, then you’ve likely been under watering. If they’re mushy then you’ve either been watering too frequently or you’ve over potted your phalaenopsis and surgery is appropriate.
Surgery: Removing the Spike and Mushy Roots
If your phalaenopsis is in spike, I understand your reluctance to remove it for the spike may have beautiful flowers. But you want your stressed phalaenopsis to direct its resources to growing vital new roots rather than to maintaining its spike.
When I cut my orchids, I use a clean pruner that I’ve either heated with a flame or on which I’ve sprayed 91% isopropyl alcohol to presumably kill microorganisms. From orchid to orchid I repeat cleaning and spraying the pruner.
Cut the spike as close as possible to your orchid’s crown and place the spike in a tall, water-filled, translucent container. If the spike has flowers they will continue to bloom and the buds might continue to develop.
As for the roots, I water them to help discern healthy roots and trim away mushy roots.
Repotting
Let’s consider: media, container, and positioning.
Media
I usually keep my phalaenopsis in either fresh (but not fine) fir bark, sphagnum moss, or a mixture of the two. BTW, these days, in the US, Lowe’s charges about $8 for 8 quarts of “Better-Gro Special Orchid Mix.” Of course, I don’t work for Better-Gro! Rather this brand works well and includes charcoal and perlite which enhance air flow.
Regarding sphagnum moss, it does retain water and so is an excellent medium if you want to avoid frequent watering or live in a warm climate. But occasionally I read people complaining that this moss kills their orchids. I believe, however, that this moss is not “the” problem. Rather the problems include: too frequent watering, oversized containers, or moss that has been packed too densely about the orchid’s roots. All of these can keep roots soaking wet for too long. Remember, whichever medium you use, the goal is for the medium to afford the roots a humid environment without keeping the roots soaking wet for days!
Container
Container size is very important. If your orchids roots are sprawling then imagine them balled up. You can render deep containers functionally shallower by placing at the container’s bottom: pieces of styrofoam, an inverted plastic cup (requires space but does not store water), or small rocks. By the way, the rocks enhance the container’s stability.
I keep my orchids in repurposed, transparent, plastic containers with ventilation hole on their sides and drainage holes in their bottoms. To make these holes, I use a rotary tool (such as a Dremel brand) and cutting blades. But for less money and with greater safety you can form holes by melting the plastic with an inexpensive soldiering iron. Do check out “My Cheap Orchid Pots.”
Positioning
First locate the orchid’s lowest leaf. Then place the orchid so the juncture of this leaf with the orchid’s body will be at least 1/4 inch above the medium’s surface. This way, if you water carefully, water will not collect between the leaf and the orchid’s body. With your orchid properly positioned you can insert the media. Remember, whichever medium you use, the goal is for the medium to afford the roots a humid environment without keeping the roots soaking wet for days!
Stimulating Growth with Heat
Below, I describe how you can use heat to stimulate root growth. But if you do not have a heat source then a repot may be sufficient, especially during the spring or summer when your orchid is most likely in growing mode. Helpful also, is keeping your orchid in a humid environment with some sun but not many hours of direct sun.
If after say six or eight weeks, your orchid does not appear better then remove it and inspect its roots. If roots are growing but some are rotting then perhaps you should have used a smaller container or have added more ventilation holes to shorten the “wet phase.” With experience you will come to best estimate appropriate container size.
Regardless of the season, the key for promoting phalaenopsis growth is heat. I place the container on a heat mat. Currently, I use an inexpensive AC Infinity SUNCORE A5, Waterproof Seedling Heat Mat, available in many sizes and on many online sites. To adjust the heat level, I keep a thermometer on the mat and set the control for a temperature between 80 and 85 degrees Fahrenheit. (BTW, I have found that the A5 does not provide exact temperature control, so look for newer models that provide a “Digital Thermostat Controller for Exact Temperature Levels.”)
To make sure the roots warm up, I capture the heat rising from the mat by placing the container in a heat trap. If you don’t do this then the plant does not well warm during winter here in Milwaukee.
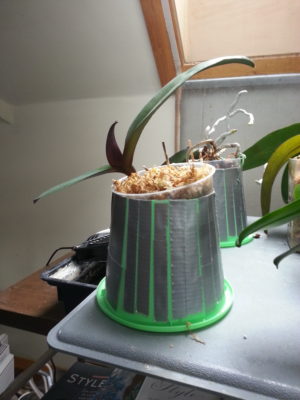
Above you can see a phalaenopsis resting in moss, in a clear plastic container. (For illustrative purposes, the container is set on an angle.) Supporting the container is an inverted green container whose bottom was removed and whose holes had been covered with duct tape. This inverted container is the heat trap. The trap is resting on a gray heating mat.
I’ve also made heat traps by removing the bottom of plastic containers salvaged from recycling bins. Ideally when inverted the diameter of the trap’s bottom should be greater than the diameter of the orchid pot’s bottom. Also, when inverted the diameter of the trap’s top should be about the diameter of the orchid container’s top. With these dimensions the trap well captures heat and is removable.
Before moving on, note well, that it is possible to provide too much heat. This has happened while I was using a shallow plastic container. I had followed the instructions above but had kept the heat at 100 degrees Fahrenheit. After about a month on the mat I did not see new growth. So I checked the roots and discovered that the bottom-most roots were dead. The high temperature had worked in the past, but in the past the container’s bottom had not trapped as much heat as did these shallow containers. Given this lesson, the most cautious approach is to place a thermometer on the mat and verify that the temperature is between 80 and 85 degrees Fahrenheit. (You could place the thermometer in the container but I’ve had success by just setting the thermometer on the mat.)
When to Water
Orchids with roots adapted to growing in water or light expanded clay aggregate (LECA) can certainly thrive. That said, I rarely grow orchids in water or LECA. Instead, I use, as noted above, solid media such as fir bark, sphagnum moss, and I may also amend with charcoal or perlite. One orchid commercial grower successfully used only perlite and there are other “solid” possibilities including pebbles.
To assess whether my phalaenopsis needs watering, I always keep a wooden skewer poked deep into the center of the medium. From time to time, I withdraw this “dipstick” to assess moisture level. If the skewer’s end is nearly dry, as revealed by placing the end on my upper lip, then most likely my phalaenopsis needs water.
Another clue is available if you keep your orchids in transparent containers. Inspect the roots. Dry roots are gray; moist roots are green. But visual inspection cannot reveal the moisture level in the container’s center. That’s why I use a wooden skewer!
BTW, if you use only sphagnum moss as the medium, then you can discern whether the moss is dry just from the tactile feedback produced by rotating the skewer!
If you are ever in doubt about watering, don’t water! When kept soaking wet for many days phalaenopsis with roots adapted to growing in solid media will likely perish. In contrast, phalaenopsis not watered for several weeks will survive!
How I Water and Fertilize My Phalaenopsis
I use two watering containers because I water my orchids twice. First, I very thoroughly water the medium with tap or rain water, at room temperature, to wash away salt accumulations. I am very careful to not water the orchid’s crown to avoid promoting an infection. If water enters the crown I use a napkin to absorb the water, a small fan to evaporate the water, or my breath to blow the water away.
Immediately after the initial watering, I water again using tap water because it contains beneficial minerals. To the water I have added fertilizer that has been diluted to about 1/4 the recommended level.
Which fertilizer to use? They all seem to work, even inexpensive Stern’s Miracle Grow with an analysis whose nitrogen-phosphorus-potassium designation is 24-8-16. Often recommended are fertilizers with balanced designations such as 10-10-10 or 20-20-20.
More Information
You can find valuable information about caring for phalaenopsis and other orchid species at the websites of the American Orchid Society, the St. Augustine Orchid Society, and if you live in the Midwest The Orchid Growers Guild. Also on YouTube check out the invaluable videos at “Brads Greenhouse and Gardening” and at “The Orchid Girl.”
Carefully read the advice regarding when to water for over watering or over potting orchids is the most frequent mistake of folks who have just fallen in love with growing phalaenopsis orchids!
An Addendum: Air Culture for Orchids
This section is not about rejuvenating stressed phalaenopsis, but on growing healthy phalaenopsis without much of a medium!
Recently, Rick Prokop has created the Facebook group “Air Culture for Orchids.” Rick’s aims to minimize his time caring for his phalaenopsis orchids. In particular, Rick has noted that many kinds of orchids have Crassulacean Acid Metabolism (CAM). CAM allows these orchids to conserve water in drought or high temperature conditions via night respiration. Rick, for example, has deprived healthy, well-watered phalaenopsis of water for up to three weeks and found they retain leaf and root turgor as well as good looks!
The current procedure is to remove the dysfunctional roots of a healthy phalaenopsis and keep the orchid in a tall, translucent glass vase or bottle that can well accommodate the roots. Every week the bottom 1/4, or so, of the container is filled with water containing a tiny amount of fertilizer. The orchid remains in the container for some three hours before the water is removed. The orchid receives similar care the following week.
Let Me Know
Please let me know how this page has worked for you.
–Marshall Lev Dermer
Send mail to: marshall@dermer.com
12/1/2025